The Thermo Scientific ™ product license you have acquired defines your rights to use Thermo Scientific applications and their modules (extensions) with a specific level of functionality, for a certain version, on designated equipment, and for a specific number of simultaneous users. Additionally, the license can be restricted to a specific period of time or to specific use cases.
Your product license is protected by a license key. Each time the application is launched, it checks for a valid license key. If a valid license key is found, the application runs. Otherwise, you are requested to get a valid license key. The license key is stored in a Certificate License file.
Starting with Open Inventor 10.11, the Thermo Scientific License Manager portal (TLM portal) has been introduced to allow you to manage your Thermo Scientific product licenses at the different steps of your contract life:
- To get your Certificate License file when buying a new license (Activate)
- To update your Certificate License file for your licenses under maintenance when a new version of Open Inventor is released (Upgrade)
- To update your Certificate License file when your time-limited licenses subscription has been renewed (Reactivate).
You will find below steps to follow to get or update your Certificate License file according to the type of license you purchased.
- Node Locked licenses
- Floating licenses
Activate Node Locked Certificate Licenses
In order to get your license certificate you will need:
- Your activation codes : you should have received them in your delivery email. An activation code is a long string delimited by a pair of — BEGIN TLM CODE — and — END TLM CODE — tags.
- Your machine Host ID that can be found following this documentation
If you need to activate a version older than 10.11 and did not receive activation codes, please go to our online password delivery center and fill in your details, Open Inventor and extensions license numbers, along with your hostID. Otherwise, you can now proceed to the TLM portal:
- Open TLM portal Activate menu by clicking here
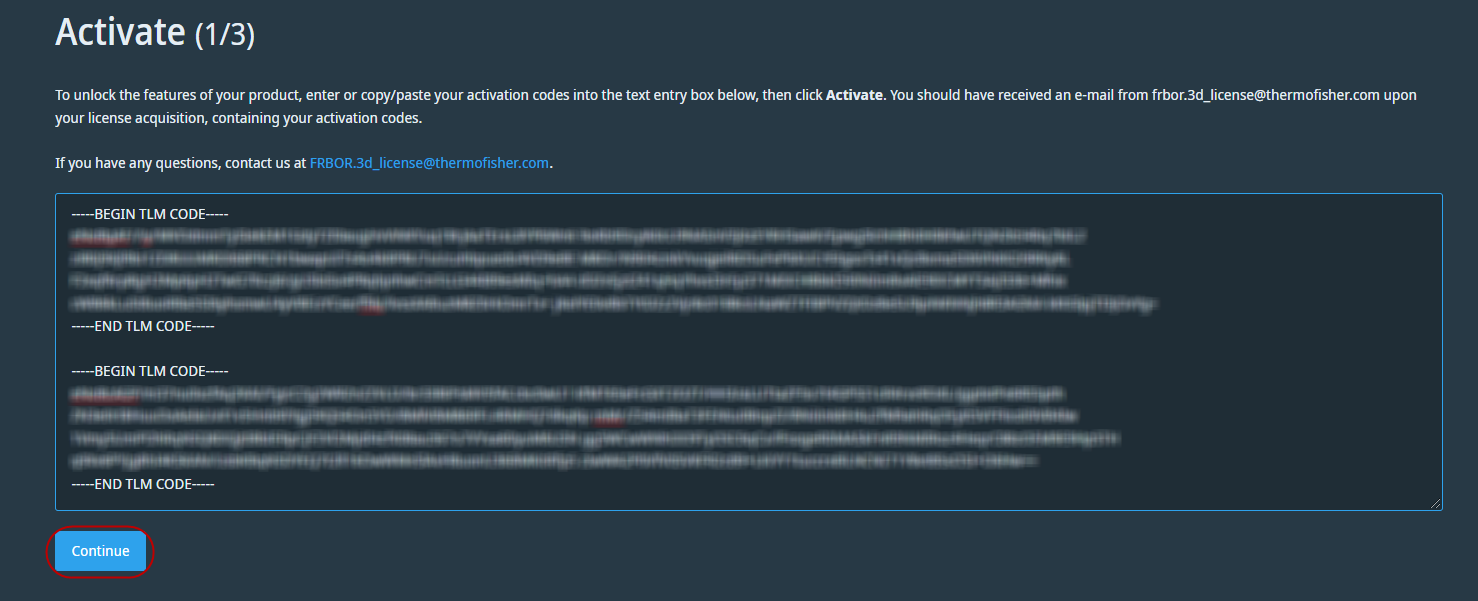
- Paste all the activation code(s) you have received, including the — BEGIN TLM CODE — and — END TLM CODE — tags, and click on Continue

-
Enter your machine Host ID, select the licenses you want to activate and click on Activate

- The result of the activation is displayed. Click on Download License File. A license certificate license.dat file is generated

- Rename the file license.dat into password.dat, and install it on the machine where your product is installed following Setting up a node-locked license instructions.
Upgrade Node Locked Certificate Licenses
When a new version of Open Inventor is released, you will need to upgrade the activated licenses on your node locked machine in order to run this new version.
In order to upgrade your Certificate License file you will need
- Your machine Host ID that can be found by following this documentation or by opening your installed certificate license file (your license server Host ID is the string following the SERVER this_host keywords)
- One of your licenses Order Line number that can be found in your delivery email, or by opening your installed certificate license file (your Order Line number is the string following the SN= keywords)
With these informations you can now proceed to the TLM portal:
- Open TLM portal Upgrade menu by clicking here
- Enter your license Host ID and one of your licenses Order Line Number. Click on Continue

- Enter the version you want to upgrade and select the licenses you want to upgrade. Click on Upgrade

- The result of the upgrade is displayed. Click on Download License File to download your updated license file

- Rename the file license.dat into password.dat, and install it on the machine where your product is installed following Setting up a node-locked license instructions.
Reactivate Node Locked Certificate Licenses
Open Inventor software can be sold as yearly renewable subscriptions. In this case, delivered licenses are time-limited and will expire, usually after one year.
Upon license expiration, the application will not be able to run anymore.
Assuming that the subscription has been renewed, you will need to reactivate these licenses to take the updated expiration date into account.
Important: the reactivation steps detailed below cannot be performed earlier than 14 days before your licenses expiration.
In order to reactivate your license certificate, you will need :
- Your machine Host ID, that can be found following this documentation, or opening your installed certificate license file (your license server Host ID is the string following the SERVER this_host keywords)
- One of your licenses Order Line number, that can be found in your delivery email, or opening your installed certificate license file (your Order Line number is the string following the SN= keywords)
With this information you can now proceed to the TLM portal:
- Open TLM portal Reactivate menu by clicking here
- Enter your license Host ID and one of your licenses Order Line Number. Click on Continue

- Select the licenses you want to reactivate and Click on Reactivate

- The result of the reactivation is displayed. Click on Download License File to download your updated license file

- Rename the file license.dat into password.dat, and install it on the machine where your product is installed following Setting up a node-locked license instructions.
Activate Floating Certificate Licenses
In order to get your license certificate you will need:
- Your activation codes : you should have received them in your delivery email. An activation code is a long string delimited by a pair of — BEGIN TLM CODE — and — END TLM CODE — tags.
- Your FlexNet license server Host ID that can be found following this documentation
If you need to activate a version older than 10.11 and did not receive activation codes, please go to our online password delivery center and fill in your details, Open Inventor and extensions license numbers, along with your hostID. Otherwise, you can now proceed to the TLM portal:
- Open TLM portal Activate menu by clicking here
- Paste all the activation code(s) you have received, including the — BEGIN TLM CODE — and — END TLM CODE — tags, and click on Continue
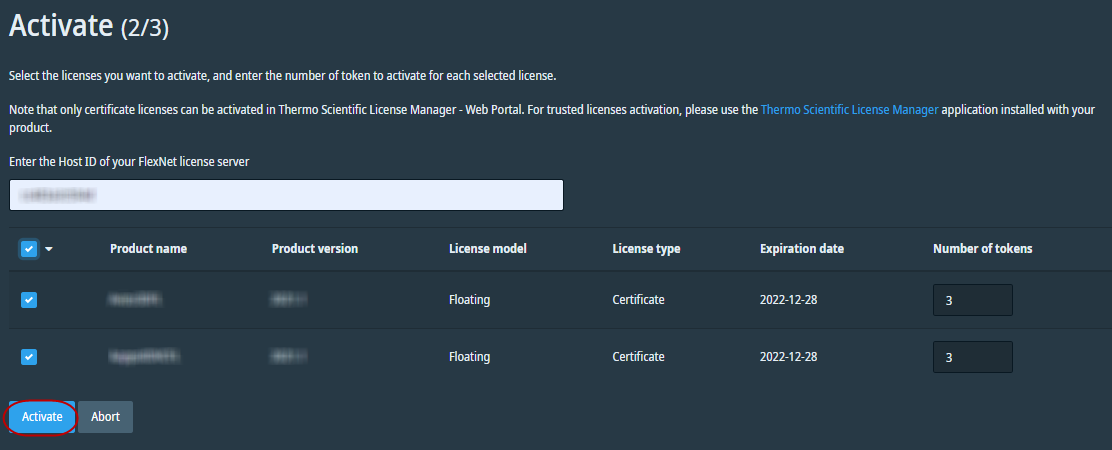
- Enter your server Host ID, select the licenses you want to activate and enter the number of tokens to activate for each license. The number of tokens must be less than or equal to the number of tokens you have purchased. Click on Activate
- The result of the activation is displayed. Click on Download License File. A license certificate license.dat file is generated. Save it at any location on the file system of the server machine

- Rename the file license.dat into passwordServer.dat, and install it on the machine where your product is installed following Installing the Server License File instructions.
- Finish license installation with the client following this documentation
Upgrade Floating Certificate Licenses
When a new version of Open Inventor is released, you will need to upgrade the activated licenses on your FlexNet license server in order to allow client application users to run this new version.
In order to upgrade your license certificate, you will need :
- Your machine Host ID, that can be found following this documentation, or opening your installed certificate license file (your license server Host ID is the string following the SERVER this_host keywords)
- One of your licenses Order Line number, that can be found in your delivery email, or opening your installed certificate license file (your Order Line number is the string following the SN= keywords)
With this information you can now proceed to the TLM portal:
- Open TLM portal Upgrade menu by clicking here
- Enter your license Host ID and one of your licenses Order Line Number. Click on Continue
- Enter the version you want to upgrade, select the licenses you want to upgrade and enter the number of tokens you want to upgrade for each license. The number of token to upgrade must be less or equal to the number of activated tokens. Click on Upgrade
- The result of the upgrade is displayed. Click on Download License File to download your updated license file
- Rename the file license.dat into passwordServer.dat, and install it on the machine where your product is installed following Installing the Server License File instructions.
- Finish license installation with the client following this documentation
Reactivate Floating Certificate Licenses
Open Inventor software can be sold as yearly renewable subscriptions. In this case, delivered licenses are time-limited and will expire, usually after one year.
Upon license expiration, each client application will not be able to run anymore.
Assuming that the subscription has been renewed, you will need to reactivate these licenses to take the updated expiration date into account.
In order to reactivate your license certificate, you will need :
- Your machine Host ID, that can be found following this documentation, or opening your installed certificate license file (your license server Host ID is the string following the SERVER this_host keywords)
- One of your licenses Order Line number, that can be found in your delivery email, or opening your installed certificate license file (your Order Line number is the string following the SN= keywords)
With this information you can now proceed to the TLM portal:
- Open TLM portal Reactivate menu by clicking here
- Enter your license FlexNet license server Host ID and one of your licenses Order Line Number. Click on Continue

- Select the licenses you want to reactivate and enter the number of token you want to reactivate for each license. The number of token to reactivate must be less or equal to the number of activated token. Click on Reactivate

- The result of the reactivation is displayed. Click on Download License File to download your updated license file

- Rename the file license.dat into passwordServer.dat, and install it on the machine where your product is installed following Installing the Server License File instructions.
- Finish license installation with the client following this documentation