To use ScaleViz facilities on a cluster, the user’s ScaleViz application first connects to the ScaleViz daemon. This daemon is in charge of running all of the necessary OIRUs (including the ScaleViz gateway), depending on what the configuration requests for the application. This is why the user must supply a configuration (defined in a simple configuration file or programmatically) describing what the application needs: how many GPUS, how to distribute and compose the rendering, which nodes to use, etc.
Here is a quick example showing the configuration file of a user application requesting four flat screens, with the ScaleViz daemon running on the cluster node named “master”:
Example 3.1. Example configuration file
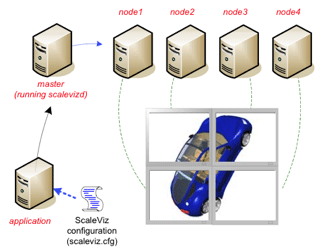
#ScaleViz V7.0 ascii

ScaleVizConfig {
    name "Four Flatscreen"
    MasterConfig {
    hostname "master"}
  FlatScreen {
    hostname "node1"
      tileSize 0.5 0.5
      tileOrigin 0.0 0.0}
  FlatScreen {
    hostname "node2"
      tileSize 0.5 0.5
      tileOrigin 0.0 0.5}
  FlatScreen {
    hostname "node3"
      tileSize 0.5 0.5
      tileOrigin 0.5 0.5}
  FlatScreen {
    hostname "node4"
      tileSize 0.5 0.5
      tileOrigin 0.5 0.0}
  }
The role of the ScaleViz daemon is quite simple: to listen to requests coming from the application. The application will search for the daemon on the machines specified by the SoMasterConfig SoMasterConfig SoMasterConfig Open Inventor node. If the connection succeeds, the application sends the configuration file to the daemon, which will then initialize all needed OIRUs on the cluster.
In order to be used with ScaleViz, the cluster must meet several requirements:
All nodes of the cluster must have the same hardware architecture. The currently supported platforms are: X86/AMD 32- or 64-bit processors.
All nodes of the cluster must run the same operating system. The currently supported operating systems are: Windows XP (32/64-bit), Red Hat Enterprise Linux (32/64-bit).
It is possible to use one of several communication layer libraries. The choice of interconnection is quite large: Ethernet, Ethernet gigabit, InfiniBand... Better bandwidth of the interconnect results in better performance for your application.
If the purpose of the cluster is mainly to do display (tiled display, immersive…), it’s strongly recommended that all of the screens be the same to assure the best final quality.
If the purpose of the cluster is to do remote rendering and/or compositing (tile and/or depth), you must use a graphics board equipped with an NVIDIA NV40 chipset or better (i.e., at least one of these generation of boards or above: GeForce 6100, GeForce FX 5200, GeForce Go 6150, Quadro FX 1300, Quadro FX Go1000)
Before using your cluster, several points must be checked to ensure the system configuration is valid:
For a user that will use the cluster, the user id, login and password must be the same on all cluster nodes. Moreover, the home directory must be shared or replicated on all nodes. We recommend configuring your cluster using NIS (or equivalent) user accounts. This avoids having to replicate your libraries and runtimes on each node of the cluster.
On UNIX/Linux platforms, the user must be able to connect through ssh from any node to any other node of the cluster without being asked for any kind of authentication. It is therefore necessary to use the ssh public key process to identify each user. See section below on how to set up ssh.
To ensure connectivity through the entire cluster and to avoid connection failure, no firewall must be installed on the internal network interfaces.
At least one node of the cluster must be reachable from the external network, to allow connection with the user application.
If you are using the cluster for composited rendering, the render nodes are not required to have a display physically attached. However, on Linux, the X server must be running.
Any user that uses the cluster should be able to access the displays (appropriate authentication).
Here are some guidelines for setting up ssh to allow user login without asking for a password. Check with your system administrator for more information. It is assumed here that cluster nodes and the master share the same file system (shared account directory).
A pair of public/private keys is needed for authorization. You can create such a key pair with the ssh-keygen command. You may want to save a backup of the files (stored in your .ssh directory) that you will change. Using ssh2, the key type can be either RSA or DSA. Use either ssh-keygen -t rsa or ssh-keygen -t dsa, as you prefer.
You are then asked to type a passphrase which should be left blank. Assuming you chose to generate a DSA key, it created two files: ~/.ssh/id_dsa and ~/.ssh/id_dsa.pub.
Append the public key (“~/.ssh/id_dsa.pub”) content to the list of authorized keys located in ~/.ssh/authorizedkeys with cat ~/.ssh/id_dsa.pub >> ~/.ssh/authorizedkeys.
Finally, some versions of ssh require that you have set all access rights of the ~/.ssh directory and contents with chmod -R og-rwx ~/.ssh
You can then test the login on a client with s sh hostname. This should open an ssh connection to the specified node and display its hostname (result of hostname command) without you having to type in any password. You should check that you can connect to each node of the cluster from the master and gateway nodes.
As described earlier, the daemon is in charge of connecting the user application to the cluster. It’s a stand-alone program which will wait for an incoming connection from a user application.
By default, the daemon waits for incoming connections on port 3456, but this can be set to a different value using a command-line option when the daemon is started. The most important thing is then to check that the selected port can accept incoming connections to allow the user application to communicate freely with the daemon.
The following sections explain how to configure the daemon and also how to install/uninstall and start/stop it.
In order to simplify the setup of the application described at the beginning of the chapter, a resource file can be written in order to allow the ScaleViz daemon to automatically set up the runtime environment on the cluster. By knowing the resources available in the cluster, the daemon is able to determine the best configuration to match the application requested configuration, which can therefore have limited dependency with actual cluster setup. Otherwise, the application needs to specify a configuration relying on knowledge of cluster details.
The notion of resources is very important, and depends on the hardware available on a node. From a general point of view, you can consider that you have as many resources as you have GPUs. A GPU set up with SLI can be considered as one or multiple GPU resources. Using them as multiple resources allows the use of all of the available texture memory.
Examples:
One computer with one GPU and one screen is considered to be one resource
One computer with two GPUs and two screens can be considered to be:
You describe the resources of the cluster in a file specified by the environment variable SCALEVIZD_RESOURCES_FILE, used by the daemon. The file consists of two parts. The first part, required, describes each resource of the cluster (see the section called “Resource Description” below). The second, optional, describes the position of the screens connected to each resource (see the section called “ Screen Position Description” below). Lines starting with # are not interpreted.
The description of the resources is done between the flags #CLUSTER_NODE_LIST_BEGIN and #CLUSTER_NODE_LIST_END. Each line, which describes one resource, is composed of colon-separated fields. Here is the syntax and rules that must be followed (fields between brackets [ ] are optional, and the line must be terminated with a colon):
[ResourceId]::hostname:[Display]:
ResourceId: string. Is a unique id associated with the resource for potential later reference.
Hostname: string (mandatory). It specifies the network name of the node (inside the cluster). This can be the IP address or the full DNS name.
Display: string. Specifies the display/GPU pair used for this node. Under Linux it looks like 0.0. On Windows the GPUs are numbered 0, 1… If no display is set, the daemon forces the value to the standard default value (0.0).
If screens are connected to the cluster for use in a tiled display, you must tell the daemon how the screens are placed. To do this, between the flags #CLUSTER_DISPLAY_MATRIX_BEGIN and #CLUSTER_DISPLAY_MATRIX_END, you must specify the matrix representing the wall display. In this matrix each element is one of the ResourceIds described in the previous section. Each line (or column) of the matrix matches a line (or column) of the screen wall. On each line the ResourceIds are separated from one another by a colon. Each line must begin with an opening bracket and end with a closing bracket.
It’s also possible to define gateways in the resource file. To do this, between the flags #GATEWAY_DEFINITION_BEGIN and #GATEWAY_DEFINITION_END, you can specify the parameters for the gateways of the cluster. Here is the syntax and rules that must be followed (fields between brackets [ ] are optional, and the line must be terminated with a colon):
GATEWAY:External_Hostname:Internal_Hostname:[Communication_Port]:
GATEWAY: keyword. Must be present at the beginning of the line
External_Hostname: string (mandatory). It specifies the network name of the gateway as seen from the external network. This can be the IP address or the full DNS name
Internal_Hostname: string (mandatory). It specifies the network name of the gateway as seen by machines inside the cluster. This can be the IP address or the full DNS name
Communication_Port: int. Specifies the port used by the gateway for communication associated with its external hostname (ie used for communication outside the cluster)
As explained earlier, the purpose of this file is to allow the daemon to do automatic configuration of rendering layout. The application does not need to specify the cluster configuration.
Several examples of Scaleviz daemon resources configuration can be found in $OIVHOME/data/ScaleViz/config directory.
The configuration shown previously in the Example 3.1, “ Example configuration file” required that the user calculate the tileSize and tileOrigin value for each node, forcing him to know the screen position and which screen is connected to a given node. With the auto configuration capability the only two things the user has to specify are the type of node he wants to use and how many of these nodes he needs. For example, on a cluster composed of 6 nodes and 6 screens, the end result is a simple application configuration file like the following:
Example 3.2. Automatic configuration for tiled display
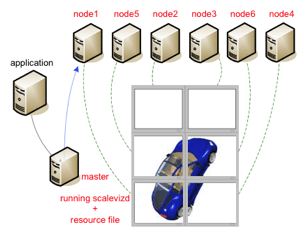
Application config file:

  ScaleVizConfig {
    name "Six Flatscreen"
    MasterConfig {
      hostname "master"}
  FlatScreen { }
  FlatScreen { }
  FlatScreen { }
  FlatScreen { }
  FlatScreen { }
  FlatScreen { }
  }

Resource file description:

#CLUSTER_NODE_LIST_BEGIN
  downLeft :1:node1:0.0:
  topLeft :0:node2:0.0:
  topRight :0:node3:0.0:
  downRight:0:node4:0.0:
  middleLeft:0:node5:0.0:
  middleRight :0:node6:0.0:
#CLUSTER_NODE_LIST_END

#CLUSTER_DISPLAY_MATRIX_BEGIN
  [ topLeft : topRight ]
  [ middleLeft : middleRight ]
  [ downLeft : downRight ]
#CLUSTER_DISPLAY_MATRIX_END
With its capability to auto configure, the daemon will then select the six displays that best match the screen wall of the cluster.
When doing tiled compositing (see the section called “ Tile compositing”), the way the daemon distributes the scene is only dependent on the number of resources requested by the user. In other words, it is not necessary to supply the cluster display matrix portion of the auto config file.
For an even number of nodes, the height of the scene is separated into two rows, and the width into “Number_of_nodes/2” columns. The following figure illustrates the situation for 8 and 6 nodes.

For an odd number of nodes, the scene is distributed as indicated by the following figure (example for 5 and 7 resources):

If you want to use a different layout, you will need to specify the tiles manually in your configuration file using the tileOrigin and tilePosition fields of the SoTileComposer SoTileComposer SoTileComposer node.
The ScaleViz daemon (scalevizd program) can be launched by the following command:
Linux:
cd $OIVHOME/bin
./scalevizd [-start <port_number>]
Windows:
cd %OIVHOME%\Program
scalevizd [-start <port_number>]
If no parameter is given on the command line, the daemon will run with default parameters (port set to 3456)
If you want to launch the daemon on a port other than the default, just add the “-start <port_number>” parameter on your command line, with port_number set to the value you want. For example:
Linux:
cd $OIVHOME/bin
./scalevizd -start 4444
Windows:
cd %OIVHOME%\Program
scalevizd -start 4444
This will force the daemon to await an incoming connection on port 4444.
If the daemon has been launched in the background, it is possible to stop it without having to search for the process ID. Just use the following command:
Linux:
cd $OIVHOME/bin
./scalevizd -stop [<port_number>]
Windows:
cd %OIVHOME%\Program
scalevizd -stop [<port_number>]
With no other parameter on the command line, scalevizd will try to stop a daemon running on the default port. If you’ve launched the daemon using another port than the default, you can then use the “port_number” parameter to specify the port of the running daemon you want to stop.
For example, to stop the previous daemon launched on port 4444, just type:
Linux:
cd $OIVHOME/bin
./scalevizd -stop 4444
Windows:
cd %OIVHOME%\Program
scalevizd -stop 4444
Under Linux it is possible to install the daemon as a service. Only the root user can install the service.
Once logged into the root account, execute the following commands:
cd $OIVHOME/bin
scalevizd -installService [-port port_number] [-user user]
The two arguments are optional, and allow tuning the installation of the service.
-port <port_number> | Allows you to specify the port on which the service will run. If no port is specified, the default (3456) will be used. |
-user <user> | Allows you to specify which user will be the owner of processes launched by the service. If no user is specified, the current user is used. |
Once the daemon is installed as a service, it will be started automatically whenever the computer is booted. If for any reason you need to change either the port number or the user name attached to the service, you can edit the /etc/sysconfig/scalevizd.conf file and change the value you want. Changing any value in this file implies that you must restart the daemon, which can be done by using the “/etc/init.d/scalevizd restart” command (all of these commands are available only under the root account).
Of course, if the ScaleViz service has been installed, it’s possible to uninstall it. Log in as root, and use the following command:
cd $OIVHOME/bin
scalevizd -uninstallService
ScaleViz currently supports different communication libraries for each supported operating system. The library used by ScaleViz at runtime is specified by the SCALEVIZ_CLUSTERCOM environment variable in your oiv.cfg configuration file.
The following sections detail the library availability and configuration for each supported platform.
By default, SCALEVIZ_CLUSTERCOM is set to “base” which means POSIX socket implementation using an ssh connection for spawning distributed processes (see “Managing ssh login on a cluster”).
Your TCP/IP network must be correctly configured and you must be able to access each node through ssh without authentication.
This communication library is recommended for testing but not for performance reasons as it will be limited by the bandwidth and latency of the TCP/IP stack of your system.
Note for clusters using Windows: you must have an ssh server installed on each Windows node to be able to use “base” mode. As most standard Windows platforms lack such service, Windows users should generally use the MPI implementation (“mpi” mode) described below.
The “local” mode means that the daemon and all OIRUs must be executed on the same computer. This is particularly useful for application development, testing, and shared memory processor computer configuration with multiple GPUs (NVIDIA Quadro Plex attached device, for example).
You can select this communication library by adding the following line to your oiv.cfg configuration file:
SCALEVIZ_CLUSTERCOM local
If MPI is available for your interconnect and your operating system, then you should use it through the communication module provided with ScaleViz.
First install and configure the MPI package adapted to your interconnect and operating system on all nodes. Check that it is working correctly with the examples provided by the MPI package.
You must build the ScaleViz MPI-based communication library provided in
$OIVHOME/src/ScaleViz/libClusterCom/src-mpi
First check the makefile and the launch-mpi.sh script and if necessary, modify them to point to the correct MPI lib and tools (by default, values are set for a standard MPICH1.2 setup) then:
make install
Finally, update the oiv.cfg configuration file and set the SCALEVIZ_CLUSTERCOM environment variable to the following value:
SCALEVIZ_CLUSTERCOM mpi
Microsoft MPI (recommended)
ScaleViz provides a pre-compiled communication library based on Microsoft MPI (available in the VS2010 package and higher).
Before using ScaleViz with this package, you must download and install the Microsoft MPI v5 package available at the following URL:
http://www.microsoft.com/en-us/download/details.aspx?id=44990
Once the package is installed, add the following line to your oiv.cfg:
SCALEVIZ_CLUSTERCOM msmpi
MPICH2
ScaleViz provides a pre-compiled communication library based on MPICH2.
Before using ScaleViz with this package, you must download and install the MPICH2 package available at the following URL:
http://www.mpich.org/static/tarballs/1.4.1p1/
Check that your package is correctly installed by first checking the MPI test program provided in the package.
Once the package is installed, add the following line to your oiv.cfg:
SCALEVIZ_CLUSTERCOM mpi
If you want to use an MPI package other than the one provided with ScaleViz, you will need to install and configure the MPI package adapted to your interconnect and operating system. Then rebuild and install the ScaleViz MPI library cluster communication using the source files in the following directory: $OIVHOME/src/ScaleViz/libClusterCom/src-mpi