HardCopy also includes a set of “built-in” user interfaces for outputting your scene graph to a file, printer or plotter. Here is a complete list of these monitors:
These monitors give your application an easy way to specify parameters relating to your PostScript, HPGL, or CGM output. For instance, this interface allows you to specify the size of your output, the number of pens of your plotter, the color of these pens, and more.
You can select which parameters you want the user to be able to access using setPrintFilter()method and specifying an inclusion mask and an exclusion mask. The appearance can also be changed using the setPresentation()method, same as with the MeshViz editors.
The scene graph part you want to print must also be specified using the setApply() method. You can specify a simple node, a path, or a list of paths.
![[Warning]](../../images/warning.jpg)
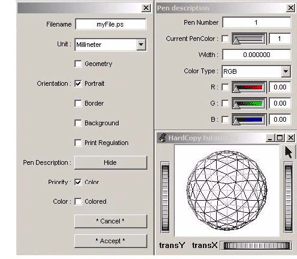
The following program (located in $OIVHOME/src/HardCopy/Mentor) creates a simple scene graph and then creates a monitor to output PostScript file:
Example 4.1. Use of HardCopy monitor
// tutorial01.cxx
#include <Inventor/Xt/SoXt.h>
#include <Inventor/Xt/viewers/SoXtPlaneViewer.h>
#include <Inventor/nodes/SoSeparator.h>
#include <Inventor/nodes/SoSphere.h>
#include <Inventor/nodes/SoDrawStyle.h>
#include <Inventor/nodes/SoPerspectiveCamera.h>
#include <MeshViz/graph/PoAngularAxis.h>
#include <HardCopy/editors/PoPrintPSMonitor.h>

  int
  main(int, char **argv)
  {
  // Initialize Inventor and Xt
    Widget myWindow = SoXt::init(argv[0]);
    if (myWindow == NULL) exit(1);

  // Initialize HardCopy
    SoHardCopy::init();

  // Create the root of the scene graph
    SoSeparator *root = new SoSeparator;
    root->ref();

  // Create the Camera node
    SoPerspectiveCamera *myCam = new SoPerspectiveCamera;
    root->addChild(myCam);

  // Use wireframe draw style
    SoDrawStyle *drawStyle = new SoDrawStyle;
    drawStyle->style = SoDrawStyle::LINES;
    root->addChild(drawStyle);

  // Create a simple sphere
    SoSphere *shape = new SoSphere;
    root->addChild(shape);

  // Create the PostScript monitor
    PoPrintPSMonitor *monitor = new PoPrintPSMonitor;
    monitor->setApply(root);

    SoXtPlaneViewer *viewer = new SoXtPlaneViewer(myWindow);

    myCam->viewAll(root, viewer->getViewportRegion());

    viewer->setSceneGraph(root);
    viewer->setTitle("HardCopy tutorial 01");
    viewer->setBackgroundColor(SbColor(1., 1., 1.));
    viewer->show();
    viewer->viewAll();

  // Do not forget to map the monitor!!!
    monitor->show();

    SoXt::show(myWindow);
    SoXt::mainLoop();

    return 0;
  }